martedì 30 novembre 2021

Christmas Tree decoration with Heffy Doodle

Hi there and happy tuesday!
Today I'm sharing a cute Christmas Tree felt decoration, made with all Heffy Doodle products..


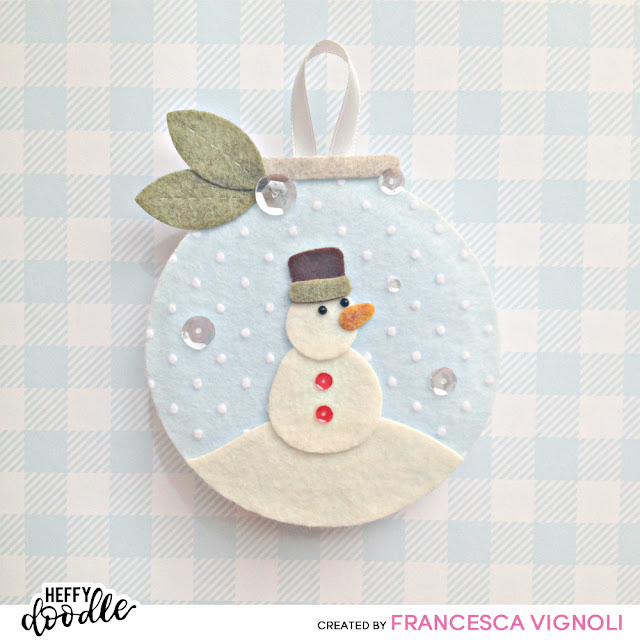
Aww this little snow cutie is adorable, isn't it?!
I was looking at the Hot Air Balloon Dies the other day and I thought: "this shape works perfectly as a Christmas bauble!". 
So I die cut it multiple times out of felt and I used all felt from my stash: I had a pretty light blue one with white dots, some white one for the back and snow hill and a beige/ grey one for the top bauble element.


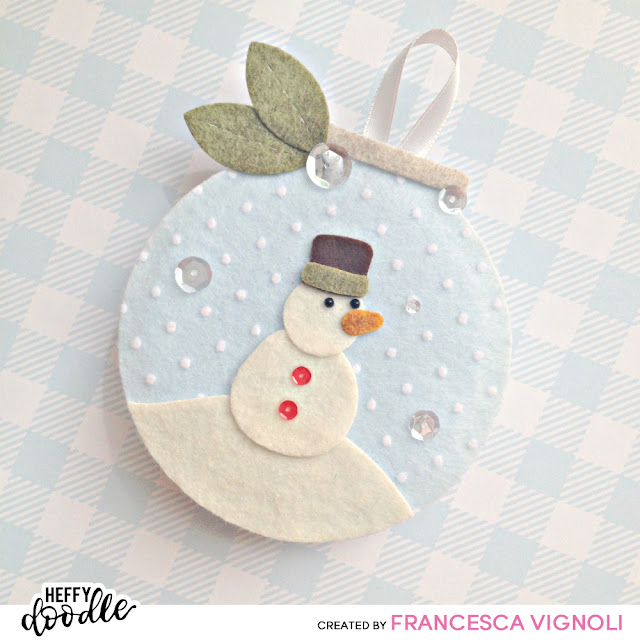
I free hand cut a snowy hill out of one of my white die cuts and then glued everything together, making sure I sandwiched a little ribbon at the top. You could easily stitch this together instead, I found glue was the easieast option here, since I was already going to glue down all the other elements. 
You have to be patiente though, if you're not using hot glue cause it will take some time to dry completely.
Also I didn't use stuffing for the inside cause I wanted a pretty flat ornament, I definitely recommend stitching if you'd like to add that instead :)
Best part: having fun with the decorations! 
So I created a little snowman using the Wanna Build a Snowman and die cut some leaves with the new Forest Leaves Dies for the top. I had some muted colors of felt so I went for a more elegant look, but you could definitely rock this in bright red, green and blues for a Classic Christmas style! 


I used some red sequins for the snowman buttons and some clear ones to embellish my snowy sky, plus some Nuvo Drops in black for its eyes.
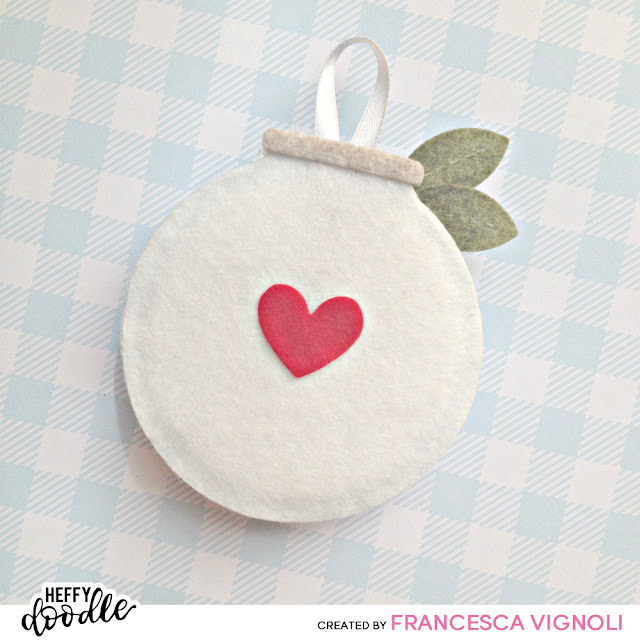
On the back I added a little heart that was die cut using the Whole Lotta Hearts Dies out of red felt.
I had so much fun creating this ornament, it was super relaxing! 
You could also re-create this out of paper using all the Heffy Doodle colored cardstock and even create little kits for kids to play with :) 

Hope this inspires you to strech all your crafty supplies and create something new!

 Please enjoy my Cardmaking Adventure on * Instagram*! I'll be posting all my little cards,tags and i also can't wait to see all the projects shared in the community! :)

See you soon with another cute project! :)

Have a lovely day ðŸ™‚
franci


mercoledì 24 novembre 2021

"Snow one like you" card with Sunny Studio

Hello there and happy wednesday! 
There's a fantastic sale going on at Sunny Studio Stamps.. be sure to check it out! 


Today I'm sharing a sweet Winter card featuring the Snowone Like You set by Sunny Studio..


Aww look at this adorable cuties! 
First of all I stamped, colored with copics and die cut this lovely image, then I moved onto my card elements.


I die cut multiple stitched rectangles out of white cardstock and patterned paper from the All Is Bright set. I inked the dotted light blue panel with Distress Inks on the edges, added some white dots to mimic snow and then I die cut a snowy hill out of my white panel using the Slimline Nature Borders dies.


I stamped my lovely sentiment and then assembled my card as shown with liquid glue and foam adhesive. 
Finally I added some glitters and a little heart confetti.
Aww this card is the sweetest, isn't it?!

Check all the new Sunny Studio Stamps products here down below, they're all avaiable at Ellen Hutson!

Hope you like this card as much as I do and thanks a lot for stopping by today!


Please enjoy my Cardmaking Adventure on * Instagram*! I'll be posting all my little cards,tags and i also can't wait to see all the projects shared in the community! :)

See you soon with another cute project! :)

Have a lovely day ðŸ™‚
franci


'Tis the Season with SugarPea Designs

Hello there!
Today I'm sharing a festive clean and simple card, inspired by the November Mix It Up Challenge by SugarPea Designs..


It's all about the blues, the cheer and.. the bling! Eheh!


Aww look at this little kitten! 
I had so much fun combining this kind of mono chromatic palette and the sketch together. 


Supplies: 


Hope you like this card as much as I do and thanks a lot for stopping by today!


Please enjoy my Cardmaking Adventure on * Instagram*! I'll be posting all my little cards,tags and i also can't wait to see all the projects shared in the community! :)

See you soon with another cute project! :)

Have a lovely day ðŸ™‚
franci


giovedì 18 novembre 2021

Christmas projects with Ellen Hutson!

Hi there!
Today I'm sharing a couple of Christmas projects I made with all Ellen Hutson goodies, included some from the latest Holiday Release! I'm so happy to be their guest, please be sure to pop over to the EH blog and leave me some love there too :)

Let's start with some girly Christmas tags.. 

I'm thinking about a girls night in, bringing all the festive treats, a bottle of rosè and these are the perfect little tags for all your yummy treats!


First of all I die cut few tags out of white cardstock, using the FarmHouse Tags, then I stamped my little village and the sentiment onto 2 of them with a copic friendly ink and colored them with copics.

I love this little village from the Merry Little Christmas so much! 
I stamped the village again onto a piece of masking tape, I cut it out and masked my tag image, then I sponged the sky with the Speckled Egg Distress oxide ink and a blending tool. 

Little tips:
I felt brave and colored my images first but I highly recommend doing the opposite. Mask your images and color your background first, then reveal your ready to color image and if there are little smudges, you can totally cover them with your coloring! 

When fussy cutting your masking image be sure to cut rigth in the center of your stamped lines, this will make your mask work perfeclty and will not leave any white edges around your images!


I removed my mask and did the same for my other tag, then added lots of little dots here and there to create a snowy sky with my white gel pen. I stamped the TO: and FROM: onto some more white die cut tags and glued them to my decorated ones back to back with liquid glue. 

Snowy tip: 

When you're creating a snowy scene, make sure to draw little dots on your images too: it will make your scene even more beautiful!


Then I die cut the long thin tag from the Farmhouse set twice out of white cardstock and stamped the Sweet Treats sentiment from the Tag it - Christmas set onto them.
I sponged some of the same ink used before on them, drew little dots and I secured them to my tags + I added some silver twine. 

Finally I added some sparkle details to my festive villages using the Lawn Fawn glitter pen and the White Blizzard Nuvo Drop. 

Now onto my beary cute Christmas card..


Finally mama bear and her baby look all festive with their gifts, candycanes and tangerines and they're ready for the Holidays! 
First I created my 6 1/2 by 3 1/2 inches cardbase out of white cardstock, then masked around an inch at the the bottom and inked the top with Speckled Egg Distress Ink Oxide. 


Then I stamped, colored with copics and die cut all my images. I love these cuties from the all Inside and Sweet Surprises so much! 


I put them all together into this fun festive scene and secured down to my cardbase with foam adhesive, then stamped my sentiment at the bottom. I chose this pretty one from the Merry Little Christmas set. 


Finally I added some sparkling clear sequins by Pretty Pink Posh, a little sparkle with the Lawn Fawn glitter pen and some details with my white gel pen. Little tip: I loved coloring these Christmas gift with my copics and then embellished them by drawing a dot pattern onto them, you can have fun and create a plaid, some stripe, a little heart pattern...sky's the limit! 

And if you like paper piecing, you could stamp them out onto your favorite patterned paper, then fussy cut them and glue them onto your stamped and die cut ones. This way your patterned paper gifts will have a beautiful white border around them to coordinate with all your other images.

Here are all the Ellen Hutson products featured: 


Please enjoy my Cardmaking Adventure on * Instagram*! I'll be posting all my little cards,tags and i also can't wait to see all the projects shared in the community! :)

See you soon with another cute project! :)

Have a lovely day ðŸ™‚
franci