venerdì 30 agosto 2019

"I love you fairy much" card with Heffy Doodle!

Hello friends and happy friday!

Today I have a fairy magical card showcasing the Absothootly Awesome set by Heffy Doodle to share.


I love making mini ( and not that mini) shaped cards and the new Stitched stars dies are perfect for this!

I die cut 2 stars out of white cardstock and I inked my background on the first one using a pink distress ink on to the the Cloudy skies stencil. I love that it is made to slide in the card so that you can have multiple cloudy patterns! I also added some sparkle watercolors little splatters here and there and let everything dry.


I stamped, colored with my copics and die cut all the images and I also die cut 2 little banners out of white cardstock to stamp my sentiment on using the Tag Along dies set. I love that the fairy word has its own coordinated die too!


I glued down all the elements and added some details with a white gel pen and some sparkle with my Wink of Stella clear brush.
I created a little flap using my scoring board on to the secon white star and glued it on the back of my decorated one to magically turn it into a card and that's it!

Hope you like my card and thank you so much for stopping by today! 

Please enjoy my Cardmaking Adventure on * Instagram*! I'll be posting all my little cards,tags and i also can't wait to see all the projects shared in the community! :)

See you soon with another cute project! :)

Have a lovely day 🙂
franci 

giovedì 29 agosto 2019

Tic Tac Toe inspired baby card with Penguin Palace!


Hello friends!
Today I'm happy to share another baby card made with the adorable Welcome, Little one set by Penguin Palace


I was inspired by the fun Tic Tac Toe game to design my card and I'm so happy about how it turned out!!
First I created my cardbase out of white cardstock and I inked the front with Spiece Marmelade Distress Ink Oxide, then I added some little gold watercolor splatters and let it dry completely. 


I cut little stripes of patterned paper and glued them down to build my design. I stamped, colored with my copics and die cut some images from the Welcome, Little one set and I can't get over how lovely these are!!
I glued them down with a combo of liquid glue and foam adhesive and stamped another sentiment on the top left corner.


Finally I added some gold sparkle dots here and there, a little pink flock heart in the middle ( that was die cut using the Butterflies with love die) and some details with a white gel pen.

Hope you like my card and thank you so much for stopping by today! 

Please enjoy my Cardmaking Adventure on * Instagram*! I'll be posting all my little cards,tags and i also can't wait to see all the projects shared in the community! :)

See you soon with another cute project! :)

Have a lovely day 🙂
franci 


mercoledì 28 agosto 2019

"You're incredible!" card with Sunny Studio!


Hello there!
Today I have an incredible card,ì to share.. ihih!! 

I'm showcasing the Super Duper set by Sunny Studio, with a colorfull project, perfect for all your beloved little ones.


First of all I die cut 3 Stitched Ovals ( using the biggest die inside the set) and I created a shaped cardbase with 2 of them. The third one, I die cut it with one of the Fluffy Clouds border set dies. 
I also die cut multiple elements from the Heroic Halftones paper using these dies set: Stitched Ovals, Cityscape border die and the Fancy Frames Oval Dies set.


I stamped, colored( with copics) and die cut all my images and glued everything down creating this fun and colorfull shaped card design.
I added some deatils with a white gel pen, some silver sparkle dots here and there.
Finally I stamped my sentiment in the top right corner and my card is complete!


Hope you like my card and thank you so much for stopping by today! 

Please enjoy my Cardmaking Adventure on * Instagram*! I'll be posting all my little cards,tags and i also can't wait to see all the projects shared in the community! :)

See you soon with another cute project! :)

Have a lovely day 🙂
franci 

lunedì 26 agosto 2019

Merry Christmas card with Hello Bluebird


Hello there and happy monday!
Today's project is a festive card I made with one of my favorite set from Hello Bluebird: Joyful Mouse. 


These are the other set I used on this card: Buffalo Check Background, In the Meadow Background, Merry Greeters Stamp, Gallery Frame # 3 and Oliver Alpha Die.
Hope you like it as much as I do and thank you so much for stopping by today!


Please enjoy my Cardmaking Adventure on * Instagram*! I'll be posting all my little cards,tags and i also can't wait to see all the projects shared in the community! :)

See you soon with another cute project! :)

Have a lovely day 🙂
franci 


giovedì 22 agosto 2019

A pastel Halloween with Hello Bluebird!


Hello there!
Today I' sharing with a cute Halloween pastel card made with all Hello Bluebird supplies.


I love pastel colors and too cute to spook images and here I combined both to create a pretty card, that's perfect for Halloween!
First of all I created a card base out of white cardstock and I stamped the front with the new Petal Play Background. I used a super light blue for this and I also think my ink pad is gettin dry so - thanks for that, eheh - it's just a super soft effect!!


I also stamped the Old Oak background on to another piece of white cardtsock and I die cut it using the Gallery Frame # 3 dies set. I adhered it down on to my card with some foam tape and I also added some insert pieces.
I stamped, colored and die cut lots of images from these set: Halloween Fun stamp, Ghostly Greetings stamp and Fall Buddies stamp.


I glued everything down with a combo of liquid glue and foam adhesive, I added lots of sparkle with my wink of stella clear brush and some gold glitter dots here and there. 
Finally I stamped 2 little ghost faces on the topright little window and my card is complete!

Hope you like it and thanks a lot for stopping by today!


Please enjoy my Cardmaking Adventure on * Instagram*! I'll be posting all my little cards,tags and i also can't wait to see all the projects shared in the community! :)

See you soon with another cute project! :)

Have a lovely day 🙂
franci 


mercoledì 21 agosto 2019

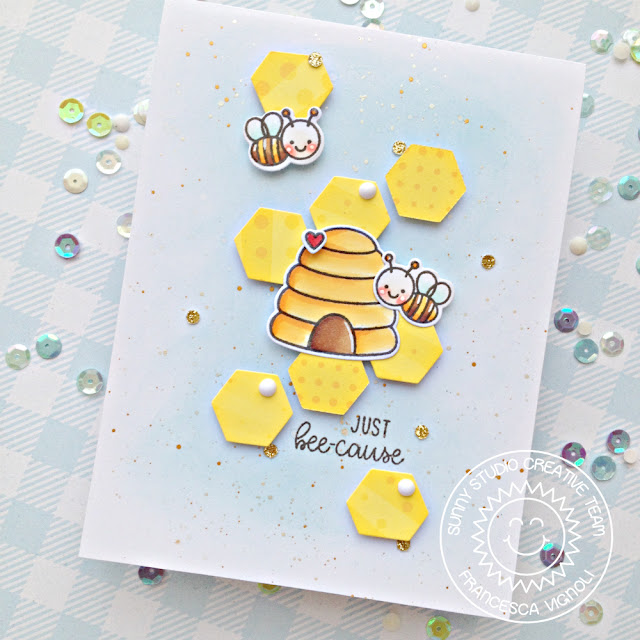
"Just bee-cause" card with Sunny Studio!


Hello there and happy wednesday!
Today I have a sweet card showcasing the  Just Bee-cause mini set by Sunny Studio to share.


First I created my card base out of white cardstock and I lightly inked the front blending Distress inks. I added some little sparkle watercolors and water splatters and let it sit to dry completely. 
I die cut the yellow patterned cardstock from the Heroic Halftones set using the Frilly Frames Hexagones dies and glued some of the inside pieces to my card using foam adhesive. 


I stamped, colored with copics and die cut all the images and glued them down as well.
Finally I added some little gold sparkle dots embellishments here and there and some white Nuvo drops as well.

Hope you like my card and thank you so much for stopping by today! 

Please enjoy my Cardmaking Adventure on * Instagram*! I'll be posting all my little cards,tags and i also can't wait to see all the projects shared in the community! :)

See you soon with another cute project! :)

Have a lovely day 🙂
franci 

lunedì 19 agosto 2019

"Hope your day is fintastic" card - Lawn Fawnatics challenge 59 !

Hello there and happy monday!

Today it's time for a new challenge over at Lawn Fawnatics! 


I made a cute shaker card with the Keep on swimming set, enjoy! 


Hope you like my card and thank you so much for stopping by today! 

Please enjoy my Cardmaking Adventure on * Instagram*! I'll be posting all my little cards,tags and i also can't wait to see all the projects shared in the community! :)

See you soon with another cute project! :)

Have a lovely day 🙂
franci 


venerdì 16 agosto 2019

A festive little pin with Hello Bluebird!


Hello there and happy friday!
Today I'm happy to share a little DIY thing I did.. a Christmas pin!


Oh.. I'm in love!!
This squirrell is adorable, look at face - I think I always say this- cause it just makes me giggle soooo much!! ahah!! 
BTW I thought it would have been too cute as a pin so.. here's it!
And here's a look at the back..


I can't wait to create many more :)
Also they would look perfect paired up with the bow on a Xmas gift packaging, don't you think?!
I mean it's such a cute project it could be considered as a gift by itself!!


Hope you like my little pin and thank you so much for stopping by today! 

Please enjoy my Cardmaking Adventure on * Instagram*! I'll be posting all my little cards,tags and i also can't wait to see all the projects shared in the community! :)

See you soon with another cute project! :)

Have a lovely day 🙂
franci 


giovedì 15 agosto 2019

A sweet Baby card with Penguin Palace!

Hi there! 
Today I'm happy to share a baby card I made with all Penguin Palace stampscuties!!


I'm so in love with the super cute babies from the Welcome, Little one set!! They are soo sweet and lovely that I couldn't wait more.. I had to make a baby card! ihih!!
First of all I stamped, colored with my copics and die cut all the images.
Then I created my background using the Butterflies with love die set, with the partial die cutting technique cause I just wanted the hearts to be featured on both sides.


This hearts frame is so lovely for a baby card, I glued some Lawn fawn pink patterned paper onthe back and te effetc is so pretty!
I die cut a cirle of vellum and I trimmed the bottom a little bit, I placed on the center of my panel and glued it dow, I also adhered all the images with a combo of liquid glue and foam adhesive.


Finally I stamped my sentiment on the bottom and I also stamped and die cut another little sentiment I glued at the top.
I added some details with a white gel pen, some sparkle with my Wink of Stella oen and some little white dots made with the Tonic Nuvo Drops.
I'm so happy about this card, I love it so so much!


Hope you like it too and thank you so much for stopping by today! 

Please enjoy my Cardmaking Adventure on * Instagram*! I'll be posting all my little cards,tags and i also can't wait to see all the projects shared in the community! :)

See you soon with another cute project! :)

Have a lovely day 🙂
franci 

mercoledì 14 agosto 2019

"Cruising by to say.." card with Sunny Studio!

Hello there and happy wednesday!
Today I have a pastel colors card showcasing the new adorable Cruising critters set by Sunny Studio to share.


First of all I created my card base out of white cardstock, I inked the front with Distress inks to create my pastel colors city sky/ background and I added some sparkly watercolors splatters. 
I die cut the Cityscape border out of white carstock and I glued it down, I stamped colored and die cut my image and adhered it down as well with some foam adhesive.


Then I die cut part of my sentiment out of gold glitter paper and I also die cut a speech bubble using a die from the Comic speech bubbles set, colored it in pink and stamped another part of the sentiment.
I glued down all the other elements and added some details with a white gel pen.
All those critters are soo cute, aren't they?!


Finally I added some little gold glitter hearts and dots to complete my design
.
Hope you like my card and thank you so much for stopping by today!

Please enjoy my Cardmaking Adventure on * Instagram*! I'll be posting all my little cards,tags and i also can't wait to see all the projects shared in the community! :)

See you soon with another cute project! :)

Have a lovely day 🙂
franci 

An Halloween shadow box card with Lawn Fawn!


Hello there!
Today I'm up on the Lawn Fawnatics blog with a too cute to spook Halloween shadow box card!


I love making sweet Halloween projects and for this one I combined the free Koala stamp set ( you can receive for free if you make a purchase on the Lawn Fawn shop in your Bday month!) and the Spooktacular set ( an oldie but new to me..  love it!! )
First of all I stamped, colored with copics and die cut all the images with their coordinated dies.

Then I built my shadow box using the Shadow box card set and I love the kraft cardstock, it creates a neutral box that you can customize for any occasion!


I glued all my images using foam tape and liquid glue.
I also use little stripes of acetate to adhere some of them and achieve the illusion of them floating on my little scene.
I die cut a little rectangle out of white cardstock to create my backgorund, I colored it with distress inks and I added some perfect pearls and white dots here and there to achieve a bright blue sparkly sky look.

Aww these Halloween cuties are adorable!!
You could stamp your sentiment on the back if you wanna include one or you could add a speech bubble to the scene.
One thing I added was.. glitter! I put some glue onto the hills and I spread some chunky glitters on top, the effect is amazing!!

Hope you like my card and thank you so much for stopping by today! 

Please enjoy my Cardmaking Adventure on * Instagram*! I'll be posting all my little cards,tags and i also can't wait to see all the projects shared in the community! :)

See you soon with another cute project! :)

Have a lovely day 🙂
franci 

lunedì 12 agosto 2019

"U're my sunshine" card with Heffy Doodle!


Hi there! 
Today I'm happy to share a lovely card showcasing the Quack me up set by Heffy Doodle!


All these little ducks are soo sweet!
First of all I stamped, colored with copics and die cut all the images, then I created a card base out of white cardstock and I also cut 2 matching stripes to build my design later.


I colored my background by sponging some distress inks and the I went on with another color and the Rain on my parade stencil to create this lovely light raining effect.
I set my design/ my little scene and as I was happy with it I glued everything down with a combo of liquid glue and foam adhesive.


Finally I stamped my sentiment, added some details with a white gel pen, some sparkle with my Wink of Stella brush and some clear sequins.


Hope you like my card and thank you so much for stopping by today! 

Please enjoy my Cardmaking Adventure on * Instagram*! I'll be posting all my little cards,tags and i also can't wait to see all the projects shared in the community! :)

See you soon with another cute project! :)

Have a lovely day 🙂
franci